|
DRN-TC
THERMOCOUPLE INPUT SIGNAL CONDITIONER
The DRN Series of DIN rail-mountable signal conditioners are available for Thermocouple, RTD, Strain, Process, AC Voltage, AC Current and Pulse/Totalizer input types. The factory calibrated signal conditioners are ideal for all process and power monitoring applications, they feature 3-way isolation, high accuracy input, programmable outputs, and are excellent front end interfaces for programmable logic controllers or data acquisition systems. For maximum user configurability the signal conditioners allow complete input-output scaling via a RS-232 connection to any PC or PLC. Software Description The signal conditioner configuration program is a MS DOS/Windows program (this manual is for the Windows version). It is designed especially for the DRN Series Signal Conditioner. This program will run on any PC with Windows application and will start automatically.
ISOLATION Three way isolation up to 1800 V Peak for 1 minute, 345 V Peak continuous per IEC spacing. Common mode rejection 100 dB INPUT OVER-VOLTAGE PROTECTION 250 V AC for 1 Minute ANALOG TO DIGITAL TECHNIQUE Dual slope READ RATE 3 readings/second, automatic polarity ACCURACY AT 25 ░C ▒1░C for temperature above -150 ░C / ▒2░C for temperature below -150 ░C TEMPERATURE STABILITY 0.05 ░C/░C STEP RESPONSE FOR RS232 OUTPUT 2 seconds to 99% of the final value (Filter time constant = 64) RESPONSE TIME To verify the response time, check the carriage return <CR> WARM UP TO RATED ACCURACY 30 minutes ANALOG OUTPUT SIGNAL TYPE Voltage: 0-10 Volt, maximum current 10mA Current 0-20 mA or 4-20 mA, maximum compliance voltage 10 Volts (maximum loop resistance 500ohm) ANALOG OUTPUT LINEARITY 0.1% of FS ANALOG OUTPUT STEP RESPONSE TIME 2 seconds to 99% of final value INPUT POWER 10 to 32 Volt DC POWER CONSUMPTION 2.4 Watts (100 mA at 24 V DC) OPERATING AMBIENT -5 to +55 ░C STORAGE TEMPERATURE -40 to +85 ░C RELATIVE HUMIDITY 90% at 40 ░C non-condensing
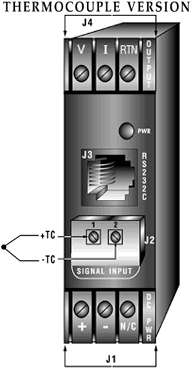
INTRODUCTION The thermocouple input signal conditioners are high performance instruments used to measure temperature for a variety of different T/C probe. The following thermocouple types may be used with the T/C input signal conditioners: J, K, T, E, R, S, B, N, and J DIN. Key features of the signal conditioners are built in cold junction compensation, patented algorithm for linearization of thermocouple to confirm to NIST tables, and a built-in RS232 interface for easy custom scaling. The RS232 interface may also be used for digital transmission of input signal to a computer or a PLC. Additional features include three way isolation between DC power, signal input and analog output/RS232. OPERATION Note: When connecting RTD probe using three wires ensure that the three lead lengths are equal for higher accuracy. Signal conditioners provide certain degree of protection against high voltage spikes (250 V ac for 1 minute) which may be induced accidentally on the RTD wires. To ensure signal integrity and safe operation never run the signal inputs wires in the same conduit with ac power lines. POWER INPUT and ANALOG OUTPUT SETUP To connect the signal input proceed as follows:
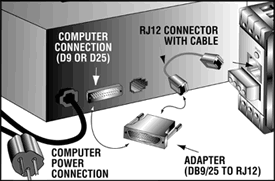
Note: If power supply used has current limiting, it may not be able to power the signal conditioners if the available output voltage is around 10Volt, since the peak current may reach 1 to 5 Amp for a few milliseconds. 2. Determine the thermocouple types used to measure the temperature. 3. Determine the positive and negative leads of the thermocouple and observe the polarity marked on the signal input cover. Then connect wires accordingly. 4. Ensure that if the selected thermocouple type is different from the default then change the internal settings in the EEPROM. This can only be done via the RS232 communication and using the configuration software explained later in this manual. 5. Connect the thermocouple wires to the screw terminal, and ensure that the screws are tight. 6. To verify that the set up is correct, you may connect a DVM to the analog output. Once connected, power the signal conditioner. If you have a thermocouple simulator then simulate a millivolt signal corresponding to the desired temperature. Measure and compare the analog output with expected values. If you are running the configuration software then the temperature corresponding to the millivolt input may be displayed Note: When calibrating thermocouples using standard millivolt input signal source, pay attention to the cold junction compensation which is at work. Suppose you want to simulate a millivolt signal corresponding to 500 ░C for type J thermocouple, while the signal conditioner is operating in a room at a temperature of 25 ░C. If you look up the millivolt output for type J thermocouple in the NIST handbook, you will find that type J thermocouple outputs 27.388 mV at 500 ░C. If you applied this signal 27.388 millivolt to the signal conditioner, you will notice that it would show a temperature approximately 25 ░C higher or about 525 ░C. The reason is that a real thermocouple is a differential device meaning that it generates a signal that is proportional to the difference in temperature between itÆs cold and hot junction. So the real thermocoupleÆs signal would have been about 1.277 millivolt less corresponding to the 25░C room temperature. Therefore you must apply a signal equal to: Signal input = 27.388-1.277=26.111 mV. Applying this signal 26.111 will display the correct temperature. 7. To view/change the scaling that relates the analog output to signal input: Connect the RS232 output of the signal conditioner to an available serial port of a computer. The cable and the DB9 or DB25 connectors are available as an option. 8. Turn on the computer, start Windows 3.0 or higher and run the Signal Conditioner Configuration Setup Program. If the program has not been installed, then insert the 3.5ö floppy disk in either drive A or B. From the Program Manager choose File, Run; in the command box type either A: setup or B: setup according to your drive designation. The program will create an icon for the signal conditioner. You may start the program by clicking on this icon. 9. To start the configuration program, you need to indicate which serial port is to be used for serial communication by checking the appropriate check box on the opening menu. Note: It is not necessary to know the serial communication protocol. i.e. baud rate, parity, 7/8 data bit and stop bit; the program will determine this information automatically. However, it is a good practice to mark the protocols used on the signal conditioner label if different from default. 10. Once the program starts it will automatically detect the signal conditioner configuration and will display a window of available options. To view the signal input click on the display on/off. 11. To change analog output scaling choose Analog Output Scaling and enter the desired values. 12. Once the custom scaling is finished, ensure that Send Configuration is clicked, otherwise the changes will not take effect. 13. The input/output scaling may be fine tuned, while both communication and analog output are active. You may make a change to the analog output in the configuration program, and watch the DVM connected to analog output of the signal conditioner follow the new settings. 14. You may save or print a particular configuration by selecting the file menu. ItÆs always a good practice to both print and save the scaling of each signal conditioner. 15. If the program is not able to establish communication then an error message is displayed. This happens either when the wrong serial port is specified or when the cable is accidentally disconnected.
|